This route is inspired by the video's on the youtube channel
"Serenity / De Parel" where
Virginia and John Kenniphaas (a name not unfamiliar to me) have
made a very extensive vlog. The nice thing is that they give
insight into what it's like to sail abroad, plus plenty of
practical tips! Below you can watch the vlog episodes how they
navigate through 5 countries.
Of course, De Parel's journey begins from their
home port near the Alkmaardermeer. Tom's planned route naturally
starts from Andijk! But of course, you can start anywhere in the
Netherlands. To keep a long story short: make sure you have the
right papers! Because, as mentioned in De Parel's vlog,
you'll be passing through five (yes, five!) countries! And each of
them has its own laws and regulations. We'll try to indicate what's
important in each country.
Now, as I mentioned, the name Kenniphaas is not unfamiliar to me.
I actually served in Ermelo in 1988 - 1989 with the Armored Engineers (11Pagncie).
In my platoon there was a man named Rick Kenniphaas. And it turns out he's a cousin
of Virginia and John. Hence the connection!
The size of your boat is the primary limiting factor for this trip, as it is on most inland routes.
While the waterways in the Netherlands, Belgium and Germany are generally modern, well-maintained and designed
to accommodate a wide range of vessel dimensions, the situation changes significantly once you enter France.
Many French canals were constructed centuries ago and retain strict limitations on beam, draft, air draft,
and overall length. Locks, bridges, tunnels and canal depths can quickly become restrictive, making careful
planning essential. Even vessels that encounter no issues in the Netherlands, Belgium or Germany may find themselves
unable to proceed on certain French waterways due to these dimensional constraints.
Classic French Canal Network (Freycinet Standard)
Fig.2 - Tunnel de Ham: Will it fit?
The "classic" French canal network is largely shaped by the historic
Freycinet gauge
A set of lock and channel dimensions established by French law in 1879, named after Minister
Charles de Freycinet. It became the practical baseline for vessels wanting broad access across
France's inland waterway network.
:
a set of lock and channel dimensions that became the
practical baseline for vessels that want broad access across France's inland waterways.
Boats built within this envelope can typically travel on a wide range of canals and many
connected rivers, while larger craft may be limited to modern, commercial waterways.
Classification: In the modern European classification of inland waters,
the Freycinet measurements are equal to Class I.
Typical maximum dimensions (rule of thumb) for this trip based upon the Freycinet Standard
Length
≈ 38 m
Beam (width)
≈ 5.0 m
Draft (underwater depth)
≈ 1.8 m
Air draft (height above water)
≈ 3.3 m (often limited by bridges and structures)
Note: Limits vary by route as some smaller canals can be tighter (shallower water,
lower bridges, shorter locks), while larger rivers and upgraded freight canals can allow
much bigger vessels. Always verify the constraints for your specific itinerary.
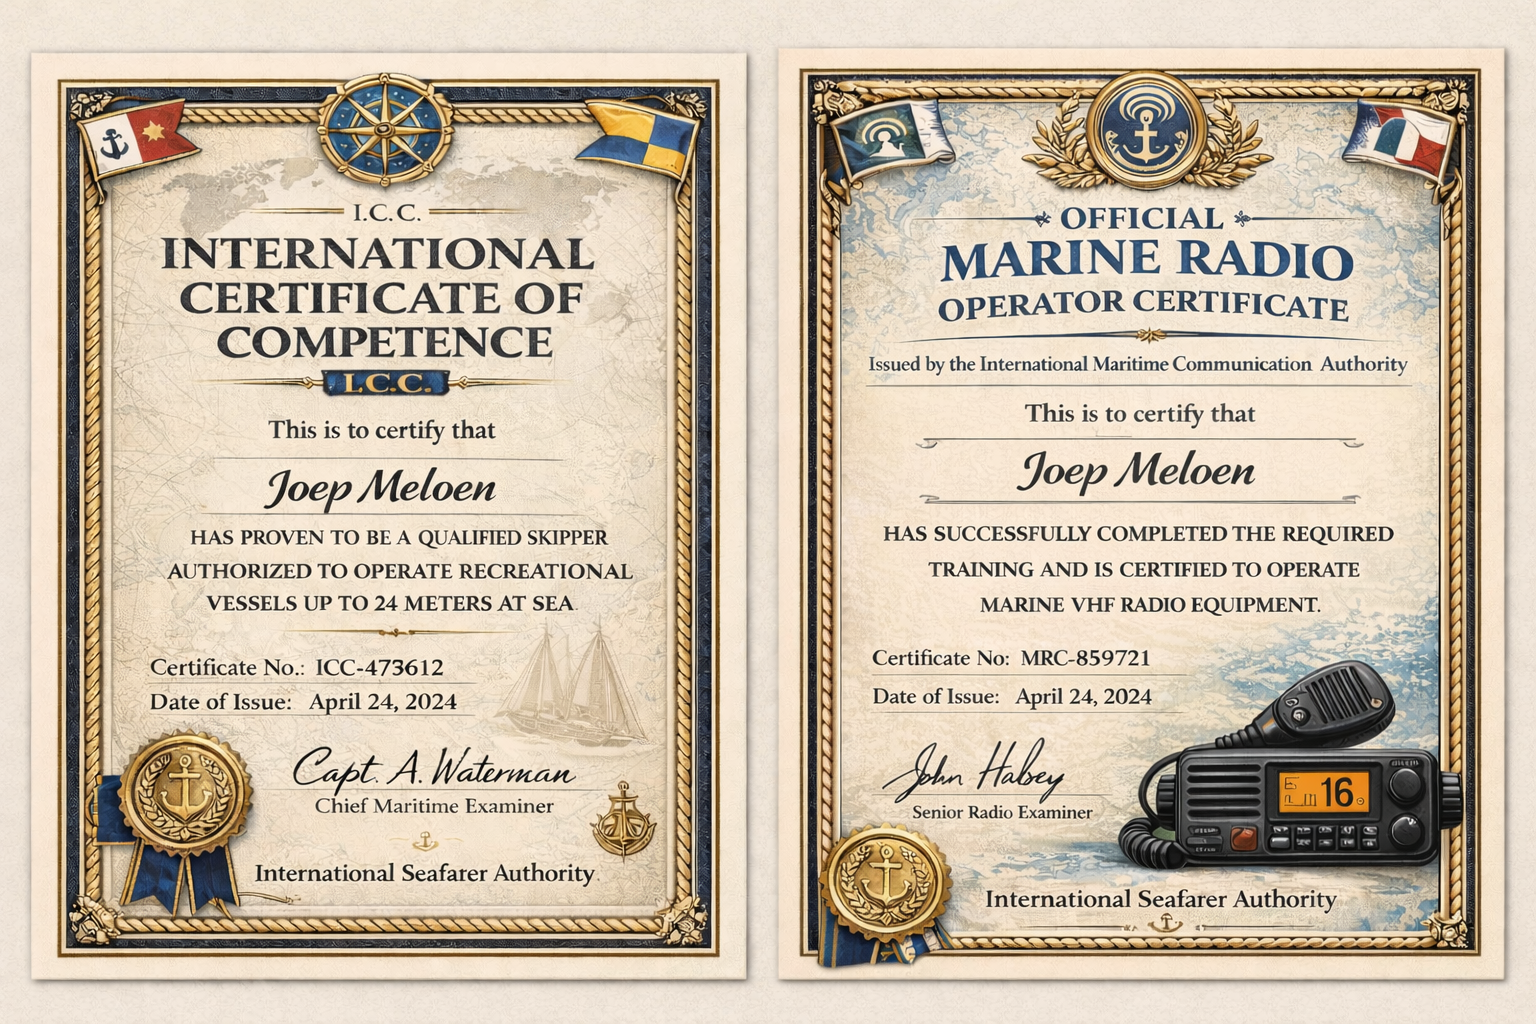
Important: This Trip Is for Experienced Skippers Only
Fig.2 - Fake Certificates
The voyages described on this website are intended only for
skippers with the proper certification(s) and at least a basic level
of boating experience and a solid understanding of how to navigate
locks safely and efficiently. This is not a beginner's route, nor is it a
step-by-step boating course. You are expected to already feel comfortable
handling your vessel in a variety of situations, including (but not limited to):
Approaching, entering and leaving locks under varying conditions.
Manoeuvring in confined waters and busy fairways.
Interpreting buoyage (
SIGNI
Système d'Information sur les Grandes Voies Navigables — the European inland waterway
buoyage and signage system, standardising marks, colours, and shapes across member states.
), signs, signals and VHF instructions (where applicable).
Planning realistic day stages based on speed, current and lock waiting times.
Familiarity with Dutch Waterways is a plus!
It will be a huge advantage when you are already familiar with
boating in the Netherlands including, for example:
Using ANWB Waterkaarten, paper charts (e.g.
1800-series) and/or multiple navigation apps in combination.
Understanding relevant laws and regulations, such as
speed limits, priority rules and environmental restrictions.
Possessing the required permits and certificates for
your boat, your engine and yourself as skipper.
Knowing how to obtain Notices to Skippers (stremmingen,
werkzaamheden, etc.) and other up-to-date information.
With all the resources available and with sufficient prior experience
on Dutch inland waters, the legs within the Netherlands, up to the point
where you join the Zuid-Willemsvaart near Den Dungen,
should be relatively straightforward to plan and execute. You should be
able to treat that part of the journey as a "normal" multi-day cruise
through familiar territory.
You Are Responsible for Your Own Calculations!
Even though we share information about our own trips, this is
not a 100% substitute for your own voyage planning. Every
vessel is different. Naturally so are the crew's comfort levels, consumptions and
budgets. You remain fully responsible for:
Vessel Clearances: checking objects along the route,
for clearances and potential restrictions before and during the trip.
Weather and water conditions: checking forecasts,
water levels and potential restrictions before and during the trip.
Fuel planning: calculating range, consumption per
hour, safety margins and refuelling points for your specific engine and
tank capacity.
Victuals (food & water): estimating how much you and
your crew need between realistic reprovisioning opportunities.
Gas usage (butane/propane): knowing your
stove/heating consumption, monitoring cylinder levels while respecting all
safety rules for storage and use.
Energy management: understanding your battery
capacity, charging options (engine/shore power/solar) and daily
consumption.
On our boat we use a detailed fuel table and calculation
method to determine how far we can travel with a given fuel
reserve and at which points it is wise to refill. An example of such a
method can be found on Tom's site: fuel table & calculation example.
We strongly recommend that you develop and maintain a similar system
tailored to your own vessel.
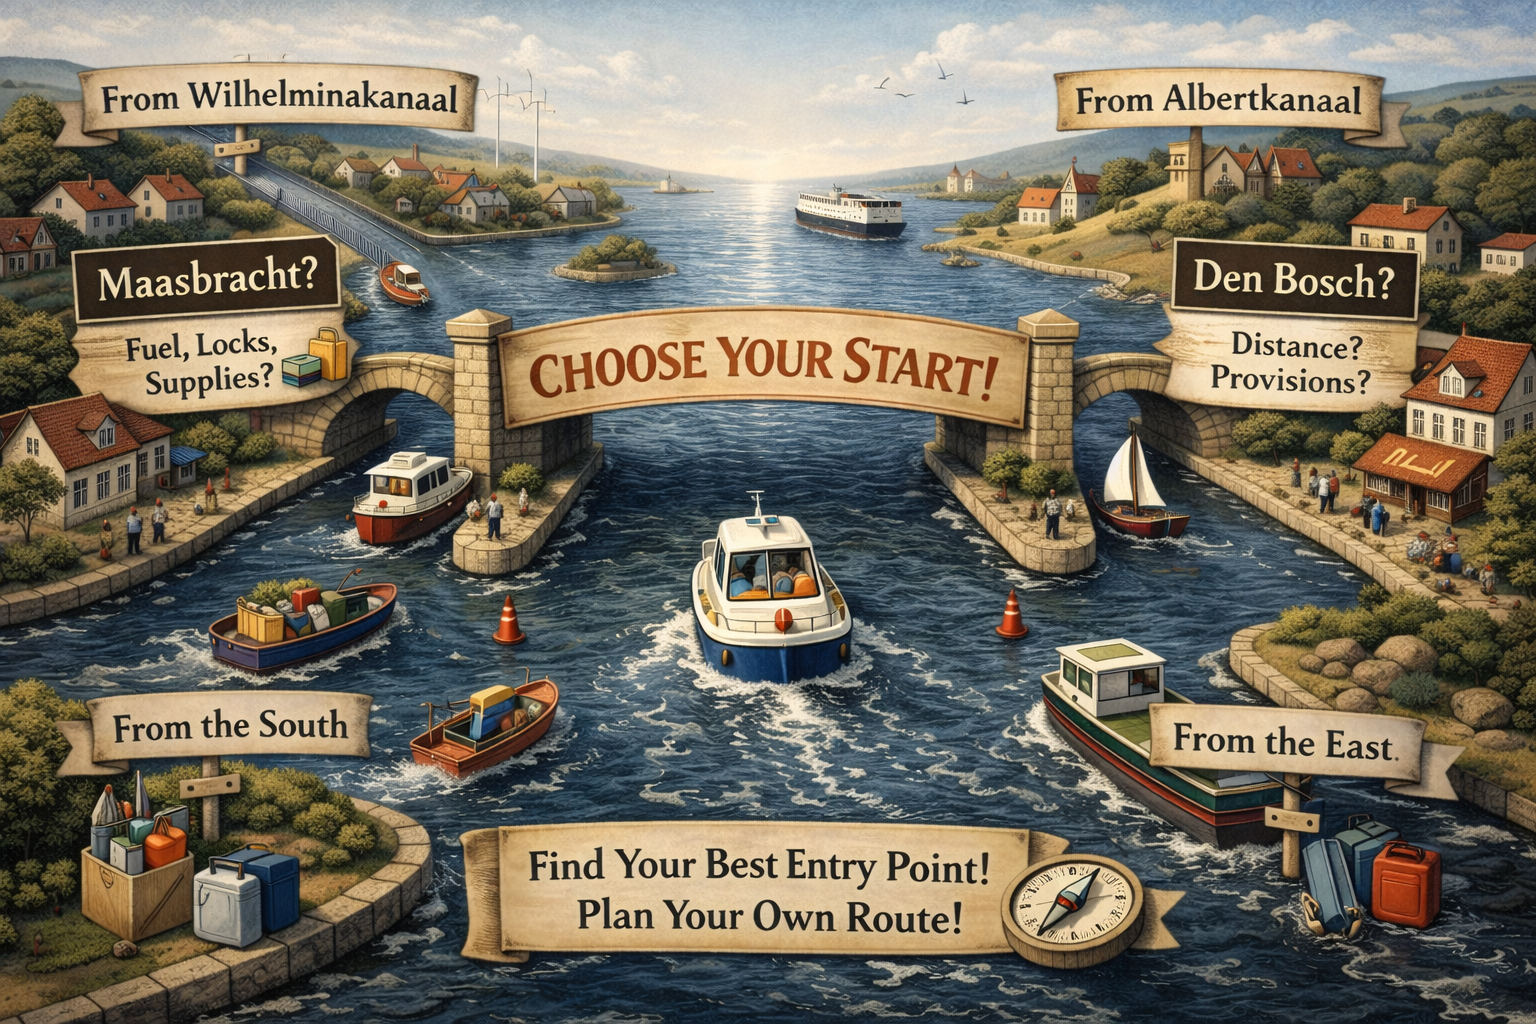
Pick Your Own Starting Point
Start at any point along the route!
Fig.3 - Choose your entry
During your planning you may find that you are geographically closer to Maasbracht
than to 's-Hertogenbosch (Den Bosch) or the other way around.
You might also be approaching the route from an entirely different direction, for example via
the Wilhelminakanaal, or from somewhere further south along the Maas. Or, even
from the Albertkanaal. In all of those cases, it makes little sense to first navigate to our
notional "start" point at Den Dungen.
For us, this route runs along the Zuid-Willemsvaart from Den Dungen to Lozen (Belgium)
, but that does not mean this is the only logical or sensible way to join it.
There is deliberately no single, fixed starting location. Simply enter the route at the point that
best matches your own position and plans, whether that is near Den Dungen, Maasbracht, somewhere
along the Wilhelminakanaal or another convenient connection.
There is no "one size fits all" answer here. You should evaluate which option is most efficient
and comfortable for your situation, taking into account:
The distance you need to cover to reach either Maasbracht, Den Bosch or another suitable entry point
along the Zuid-Willemsvaart or Wilhelminakanaal.
Your realistic fuel consumption at cruising speed and the availability of fuel
stations along each alternative approach.
The number of locks, expected waiting times and how these affect your daily rhythm
and overall schedule.
The ease of reprovisioning (supermarkets, technical supplies, gas, water) at or
near each potential entry point.
Your planned rest days, crew fatigue and personal preferences for harbours,
towns and surroundings.
In short, use our route description and notes as inspiration and reference,
not as a mandatory script. They reflect our choices and circumstances for the Zuid-Willemsvaart
between Den Dungen and Lozen, but your vessel, crew, timing and approach may differ.
Take the time to run your own numbers, study the charts and adapt the plan where necessary.
By choosing to follow this route, or any part of it, you acknowledge that you are navigating
entirely at your own risk and responsibility. All information is provided "as is",
without any guarantee of completeness, accuracy, or suitability for your specific situation.
Always consult up-to-date official sources, adjust your planning to your vessel and crew, and
never attempt a leg that you are not confident you can complete safely.
Our planning aims to avoid "upstream" travel
as much as possible (which naturally saves fuel).
Although that's not entirely possible, of course. Although, considering
going towards the middle of the Netherlands over the IJssel river, would
be certainly fighting "upstream".
The route taken by De Parel, via the Zuid-Willemsvaart, is
therefore our preferred option. Moreover, that way you enter Belgium from
another side (at Lozen) and continue navigating to Neerharen, where you can
choose to head toward Maastricht or continue along the Albert Canal. In our
route, we choose the latter option, stopping at Marina Kanne "YAKAN" in
Opkanne to visit Fort Eben-Emael and the nearby caves. Unfortunately, from
there we'll be going against the current, since about 20
kilometers after Marina Kanne we'll leave the Albert Canal and enter the
Meuse. From that moment on, we'll be in what's known as the
"upstream" section.
Important documents for this entire trip
For the entire trip
Passport(s) and/or other identification
Boating license
VHF radio certificate
Proof of ownership / purchase contract for the boat
Yeah. Annoying, I know, but for a trip like this it really is necessary.
The longer the voyage and the more borders you cross, the less forgiving
"small" oversights become. Things that feel routine on a weekend hop
suddenly turn into mission-critical decisions when you are days away from
your home berth, your usual chandler, or a mechanic who knows your engine.
This is not just a little outing. This is a serious journey, with open
stretches, remote canals, unfamiliar harbors, and different rules per
country. That is exactly why we need to zoom in on the boring stuff,
because the boring stuff is what keeps the ship moving, warm, lit, and safe.
We will go deeper into:
Engine maintenance
Spare parts and consumables
Batteries and electrical reliability
"How do I do what?" practical procedures on the move
Gas on board
DIN bottles and connectors
Filling stations and country differences
Diesel
Fuel stations
Bunkering stations
We will try to provide this information for each country. And since we will be
boating through five countries, we will divide the sections accordingly so
you can quickly find what matters where.
Spare parts: bring the ship's "immune system" with you
On a long route, spare parts are not a luxury. They are your onboard insurance policy.
Every boat has a handful of components that are small, cheap, and easy to pack,
but capable of stopping your entire voyage when they fail.
The trick is not to carry everything, but to carry the right things:
parts that are likely to fail, hard to source underway, or quick to replace yourself.
Think in layers:
Consumables you will almost certainly use.
Belts, filters, oil, coolant, impellers, fuel pre-filters, spare hose clamps,
fuses, bulbs, and a small stock of electrical connectors. These are the "paper towels"
of engine reliability. You will need them eventually, and you do not want to be hunting
for the exact size in a town where boating is not a thing.
High-impact spares.
A broken alternator belt, raw-water impeller, or lift pump does not just reduce comfort.
It can end the trip on the spot. Having a replacement onboard turns a potential
multi-day delay into a one-hour fix at a quiet quay.
Hard-to-find, boat-specific items.
Anything that depends on your engine model, shaft setup, or cooling configuration
belongs in your spares locker. If it is a part that a regular car shop will not recognize,
assume it will not be available on short notice in a random canal village.
Also, spares only help if you can actually fit them. Make sure you bring the tools,
gaskets, sealant, and manuals needed to install what you carry. A spare impeller without
the puller tool, or a fuel filter without the correct wrench, is basically a good-luck charm.
It feels comforting but does nothing.
Diesel hygiene: additives ("dopes") to keep bacteria out
Diesel on long trips comes with a hidden enemy: microbial growth, often called
"diesel bug"
Microbial contamination in diesel fuel — bacteria and fungi that thrive in the water
layer that forms through condensation at the bottom of a fuel tank. Over time they produce
slime and sediment that clogs filters and can cause sudden engine failure.
.
It is not superstition. Water condensation in your tank creates a thin layer
where bacteria and fungi can live. Over time they form slime and sediment that clogs filters,
starves the engine, and can leave you dead in the water at the worst possible moment,
like in a lock approach, a tight harbor entrance, or against a tidal current.
This is why carrying diesel additives, the old-school term is "dopes," matters so much.
A good biocide or diesel-stabilizing treatment does three jobs:
Prevents microbial growth.
By killing bacteria and fungi before they establish a colony, you avoid the filter-clogging sludge
that causes sudden power loss.
Helps fuel stay stable during long storage.
When you top up in one country and do not refill for a while, additives reduce oxidation and
keep the fuel cleaner for longer.
Buys you time when fuel quality varies.
Not every bunkering point has the same turnover or tank cleanliness. An additive is a small,
cheap buffer against bad-luck fuel.
Practically speaking, treat your fuel as you go, especially before long stretches where you will
be running the same tank for days. And always assume that if you see a sudden rise in filter
clogging, the diesel bug might be part of the story. Carrying spare filters plus additive is
the one-two punch that keeps you moving.
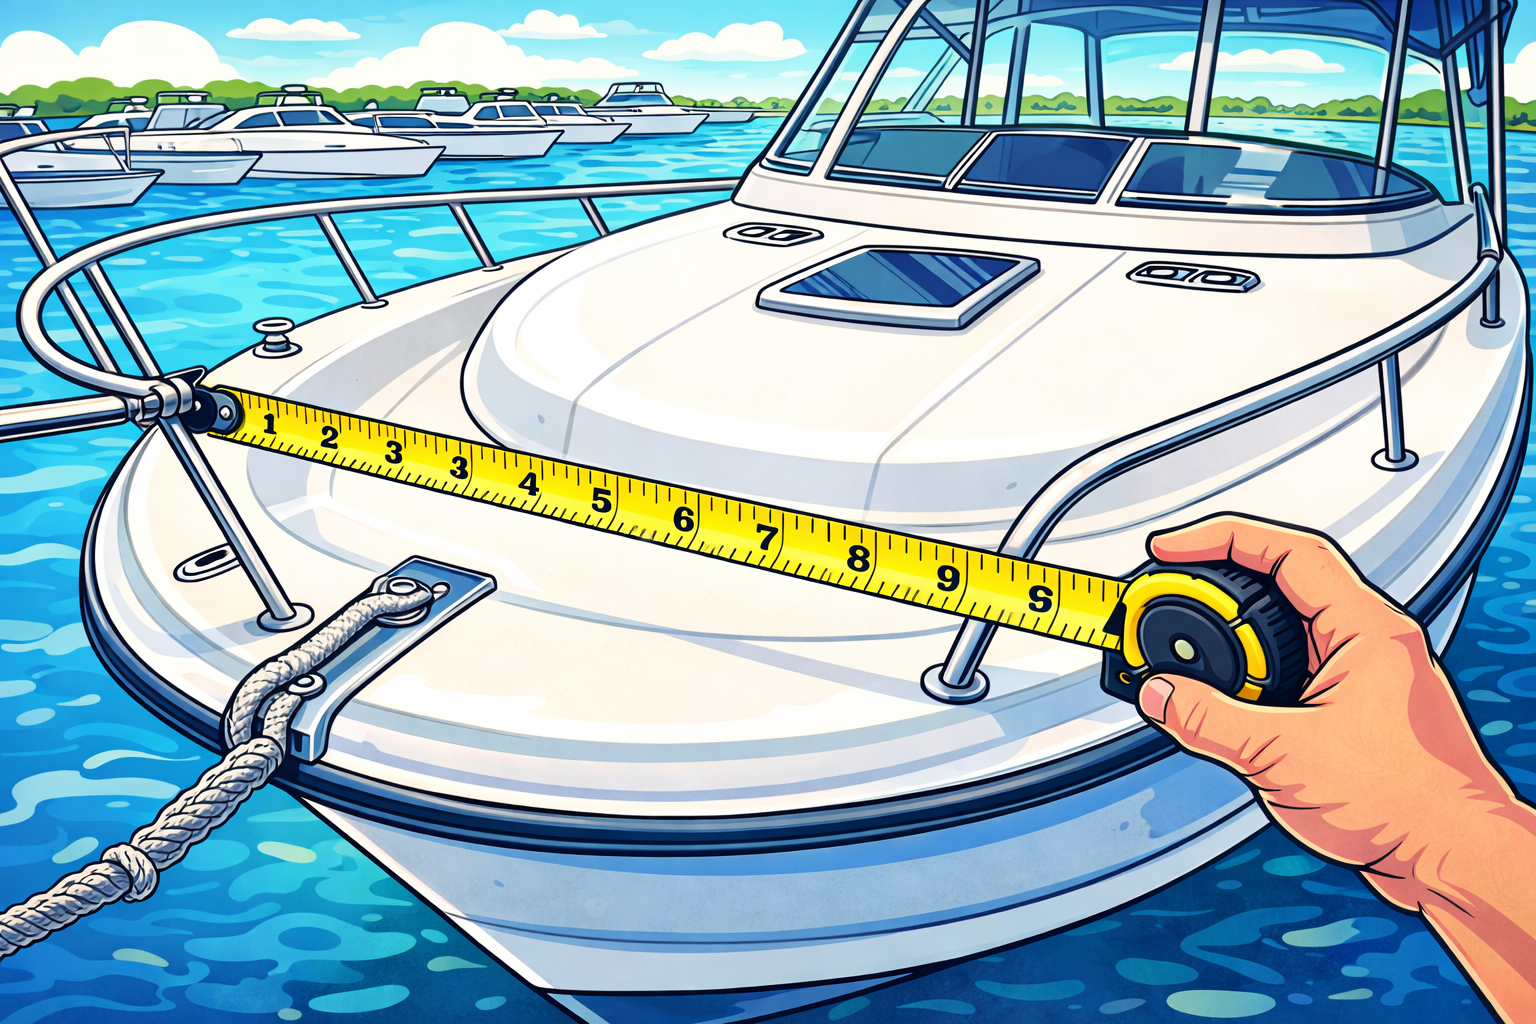
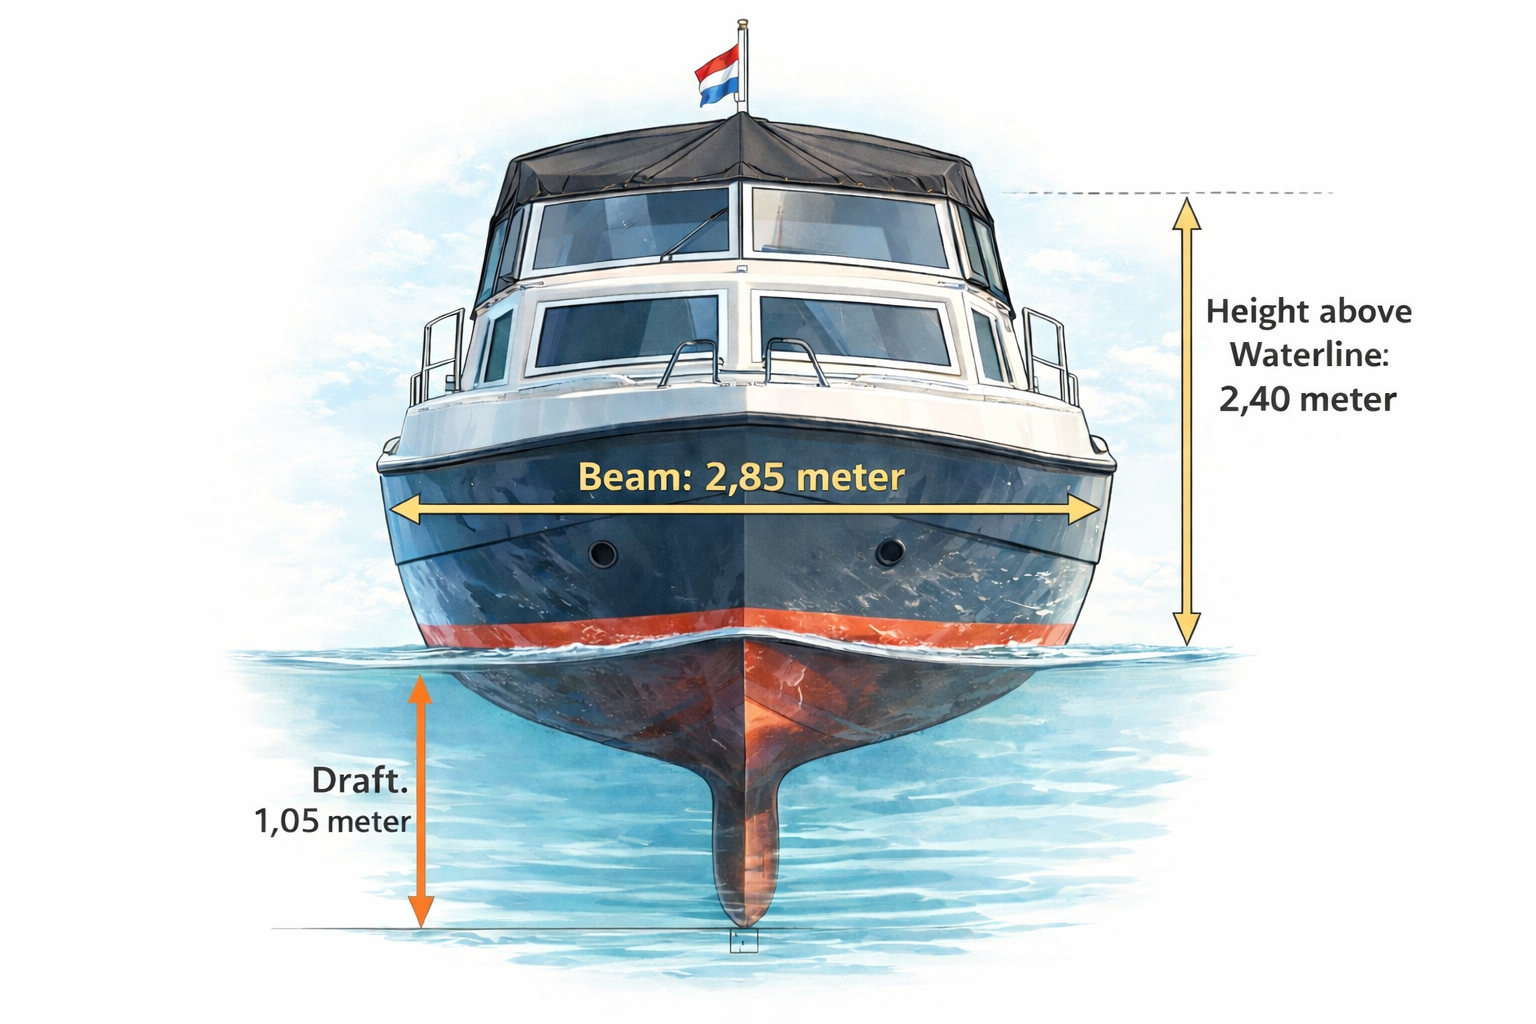
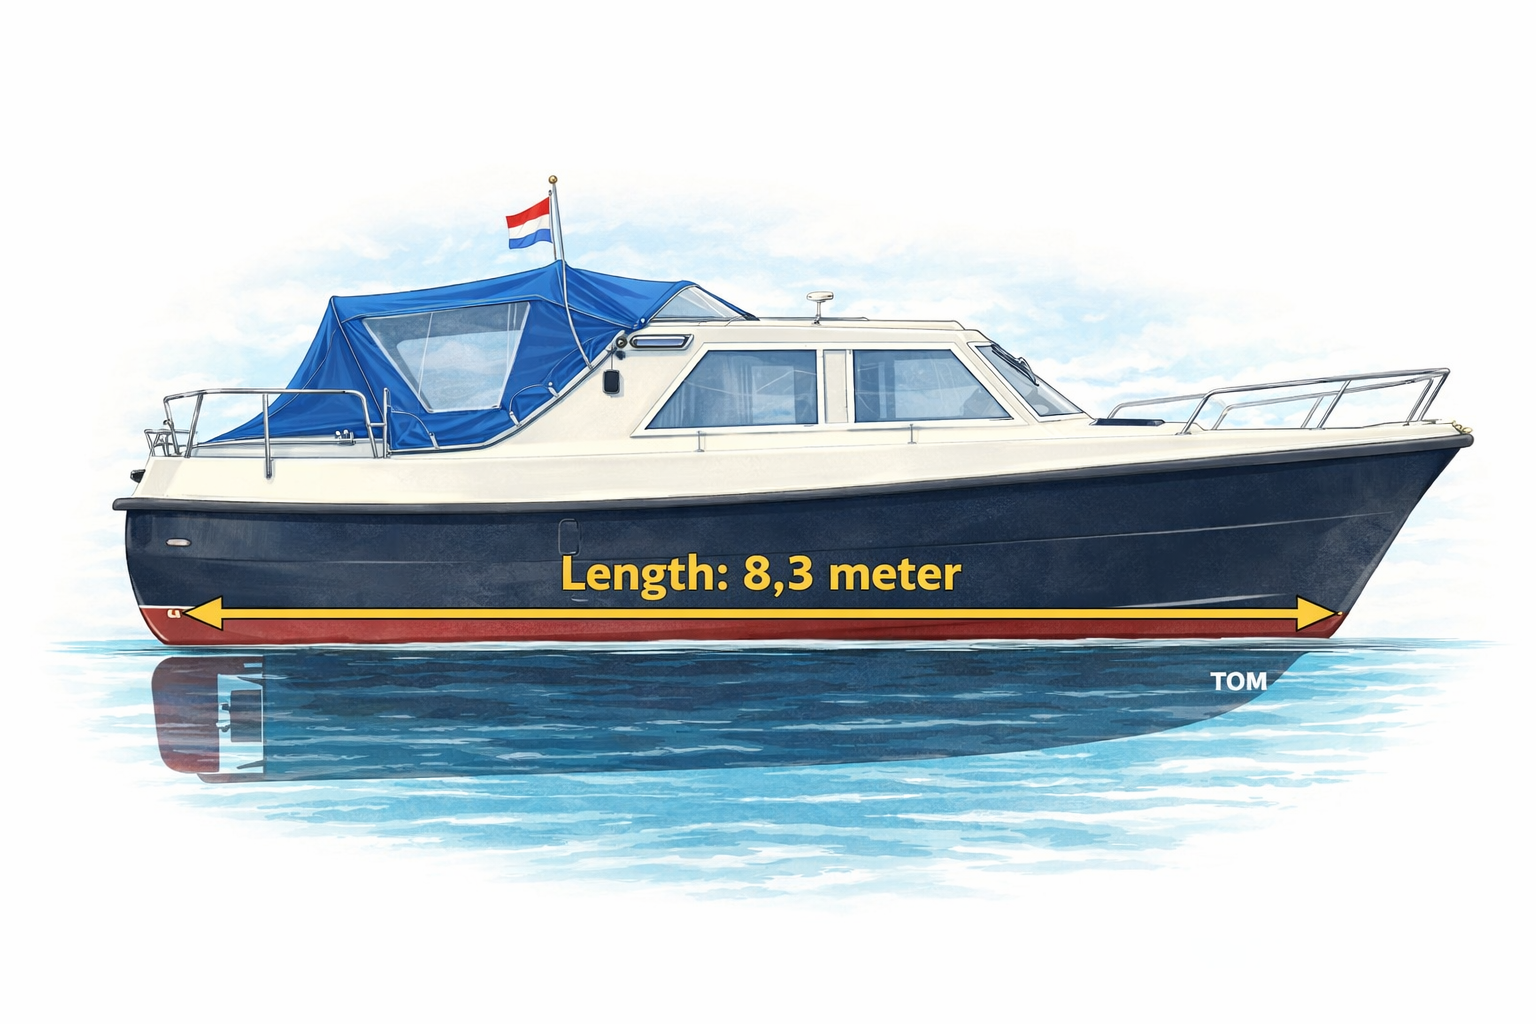
Your boat's measurements are not optional
Below you will find the measurements of Tom. The measurements of
YOUR boat are mandatory if you want to plan a proper route.
Those numbers decide whether you can actually pass an obstacle like a bridge or a lock.
For example, our Tom will not fit on the UK channel system because there are locks that are
only about 2.13 meters wide (7 feet).
So do not start this journey by hope or by guesswork. Measure your vessel yourself, write it down,
and plan with the real numbers. On trips like this, a few centimeters can be the difference between
a smooth passage and a forced detour of hundreds of kilometers (or seamiles).
While every effort has been made to provide accurate and reliable
information, waterways, bridges, locks, and other navigational objects
are subject to change after today's date. It is the sole responsibility
of the skipper to verify current conditions before and during the trip.
We cannot accept any liability for inaccuracies, omissions, or changes
that may affect your voyage.
Whenever you hold us responsible or accountable in any
form or way, we will be forced to use the legal systems to show the
world your stupidity! You, only YOU are responsible for your vessel and
people on board. Nobody else is!
(NL + BE + FR + LU + DE) Vessels up to 14.99 m (inboard diesel)
Goal: if you meet this single checklist, you meet (or exceed) the mandatory carriage rules you will encounter
on inland waters across NL, BE, FR, LU, DE, including strict “checklist” countries (FR/BE) and special areas
(e.g., Bodensee).
1) Documents & rules onboard
NL requires an up-to-date BPR onboard for most vessels.
BE lists registration & radiodocuments as required.
BE explicitly requires the traffic regulation for the sailing area onboard.
2) Safe navigation (signals, lights, charts)
BE Zone 1 requires navigatielichten (COLREG 72/APSB note).
BE Zone 1 requires a fog horn.
BE Zone 1 requires updated charts; digital is allowed.
BE Zone 1 requires a radar reflector.
FR “eaux intérieures exposées” requires a waterproof torch or individual light.
3) Mooring, towing, anchoring
BE Zone 1 requires enough lines to tow and moor, incl. a line of minimum 20 m. :contentReference[oaicite:8]{index=8}
BE Zone 1 requires anchor with line. :contentReference[oaicite:9]{index=9}; FR “exposed inland” requires anchor + rode. :contentReference[oaicite:10]{index=10}
FR requires a device allowing towing & mooring (minimum: mooring point + line). :contentReference[oaicite:11]{index=11}
4) Bilge / dewatering
BE requires a “lensmiddel”; “self-bailer alone is not enough.” :contentReference[oaicite:12]{index=12}
5) Man overboard & reboarding
BE Zone 1 requires means to find/assist drowning persons. :contentReference[oaicite:13]{index=13}
BE Zone 1 requires a swim ladder ready for use. :contentReference[oaicite:14]{index=14}
Commonly required in FR equipment sets (esp. non-trivial inland areas); keep onboard as part of the “one-fits-all” pack. (See FR list context.) :contentReference[oaicite:15]{index=15}
6) Personal safety
BE Zone 1 requires a lifejacket per person. :contentReference[oaicite:16]{index=16}; FR requires one flotation device per person. :contentReference[oaicite:17]{index=17}
BE Zone 1 requires an EHBO kit. :contentReference[oaicite:18]{index=18}
7) Fire safety (this is where “strictest country wins”)
Bodenseekreis states: min 2 kg; number depends on fuel tank volume (2 kg per 100 L). :contentReference[oaicite:19]{index=19}
Practical “one-fits-all” choice: carry at least 2 × 2 kg extinguishers (gives coverage up to ~200 L and redundancy).
Inspection: on Bodensee, extinguishers must be type-approved and checked at regular intervals (stated as every 2 years). :contentReference[oaicite:20]{index=20}
BE: blusdeken is required if open-flame appliances are present. :contentReference[oaicite:21]{index=21}
FR: CE boats follow the manufacturer/owner’s manual; otherwise national rules apply. :contentReference[oaicite:22]{index=22}
BE: extinguishing means “according to the technical requirements of the RCD”; note for pre-1998 boats. :contentReference[oaicite:23]{index=23}
8) Communications (choose the strictest practical baseline)
BE: “Vaste VHF” is required for motorboats > 7 m and cabin sailboats; portable may replace in some zones. :contentReference[oaicite:24]{index=24}
9) Storage rules for safety gear (important for FR compliance)
FR: “No safety equipment is kept in machine spaces”; guidance on alternative storage. :contentReference[oaicite:25]{index=25}
10) LPG (propane/butane) — do it to a “can’t-fail inspection” standard
Build year note (before 1990 vs after 1990)
Built before 1990: Treat as “non-CE” for practical purposes; you will often be measured against national rules and “technical requirements” references (e.g., FR non-CE branch; BE notes pre-1998 boats in extinguisher context). :contentReference[oaicite:26]{index=26}
Built after 1990: You may still be non-CE depending on when first placed on the EU market; if CE-marked, the manufacturer’s manual becomes the reference for firefighting means in FR and is used as compliance anchor elsewhere. :contentReference[oaicite:27]{index=27}
Note: Some sub-areas have additional requirements (e.g., flare sets on specific waters). This checklist targets the inland “core”
and the strictest recurring items we can confidently apply across the five countries without accidentally mixing in sea-zone obligations.
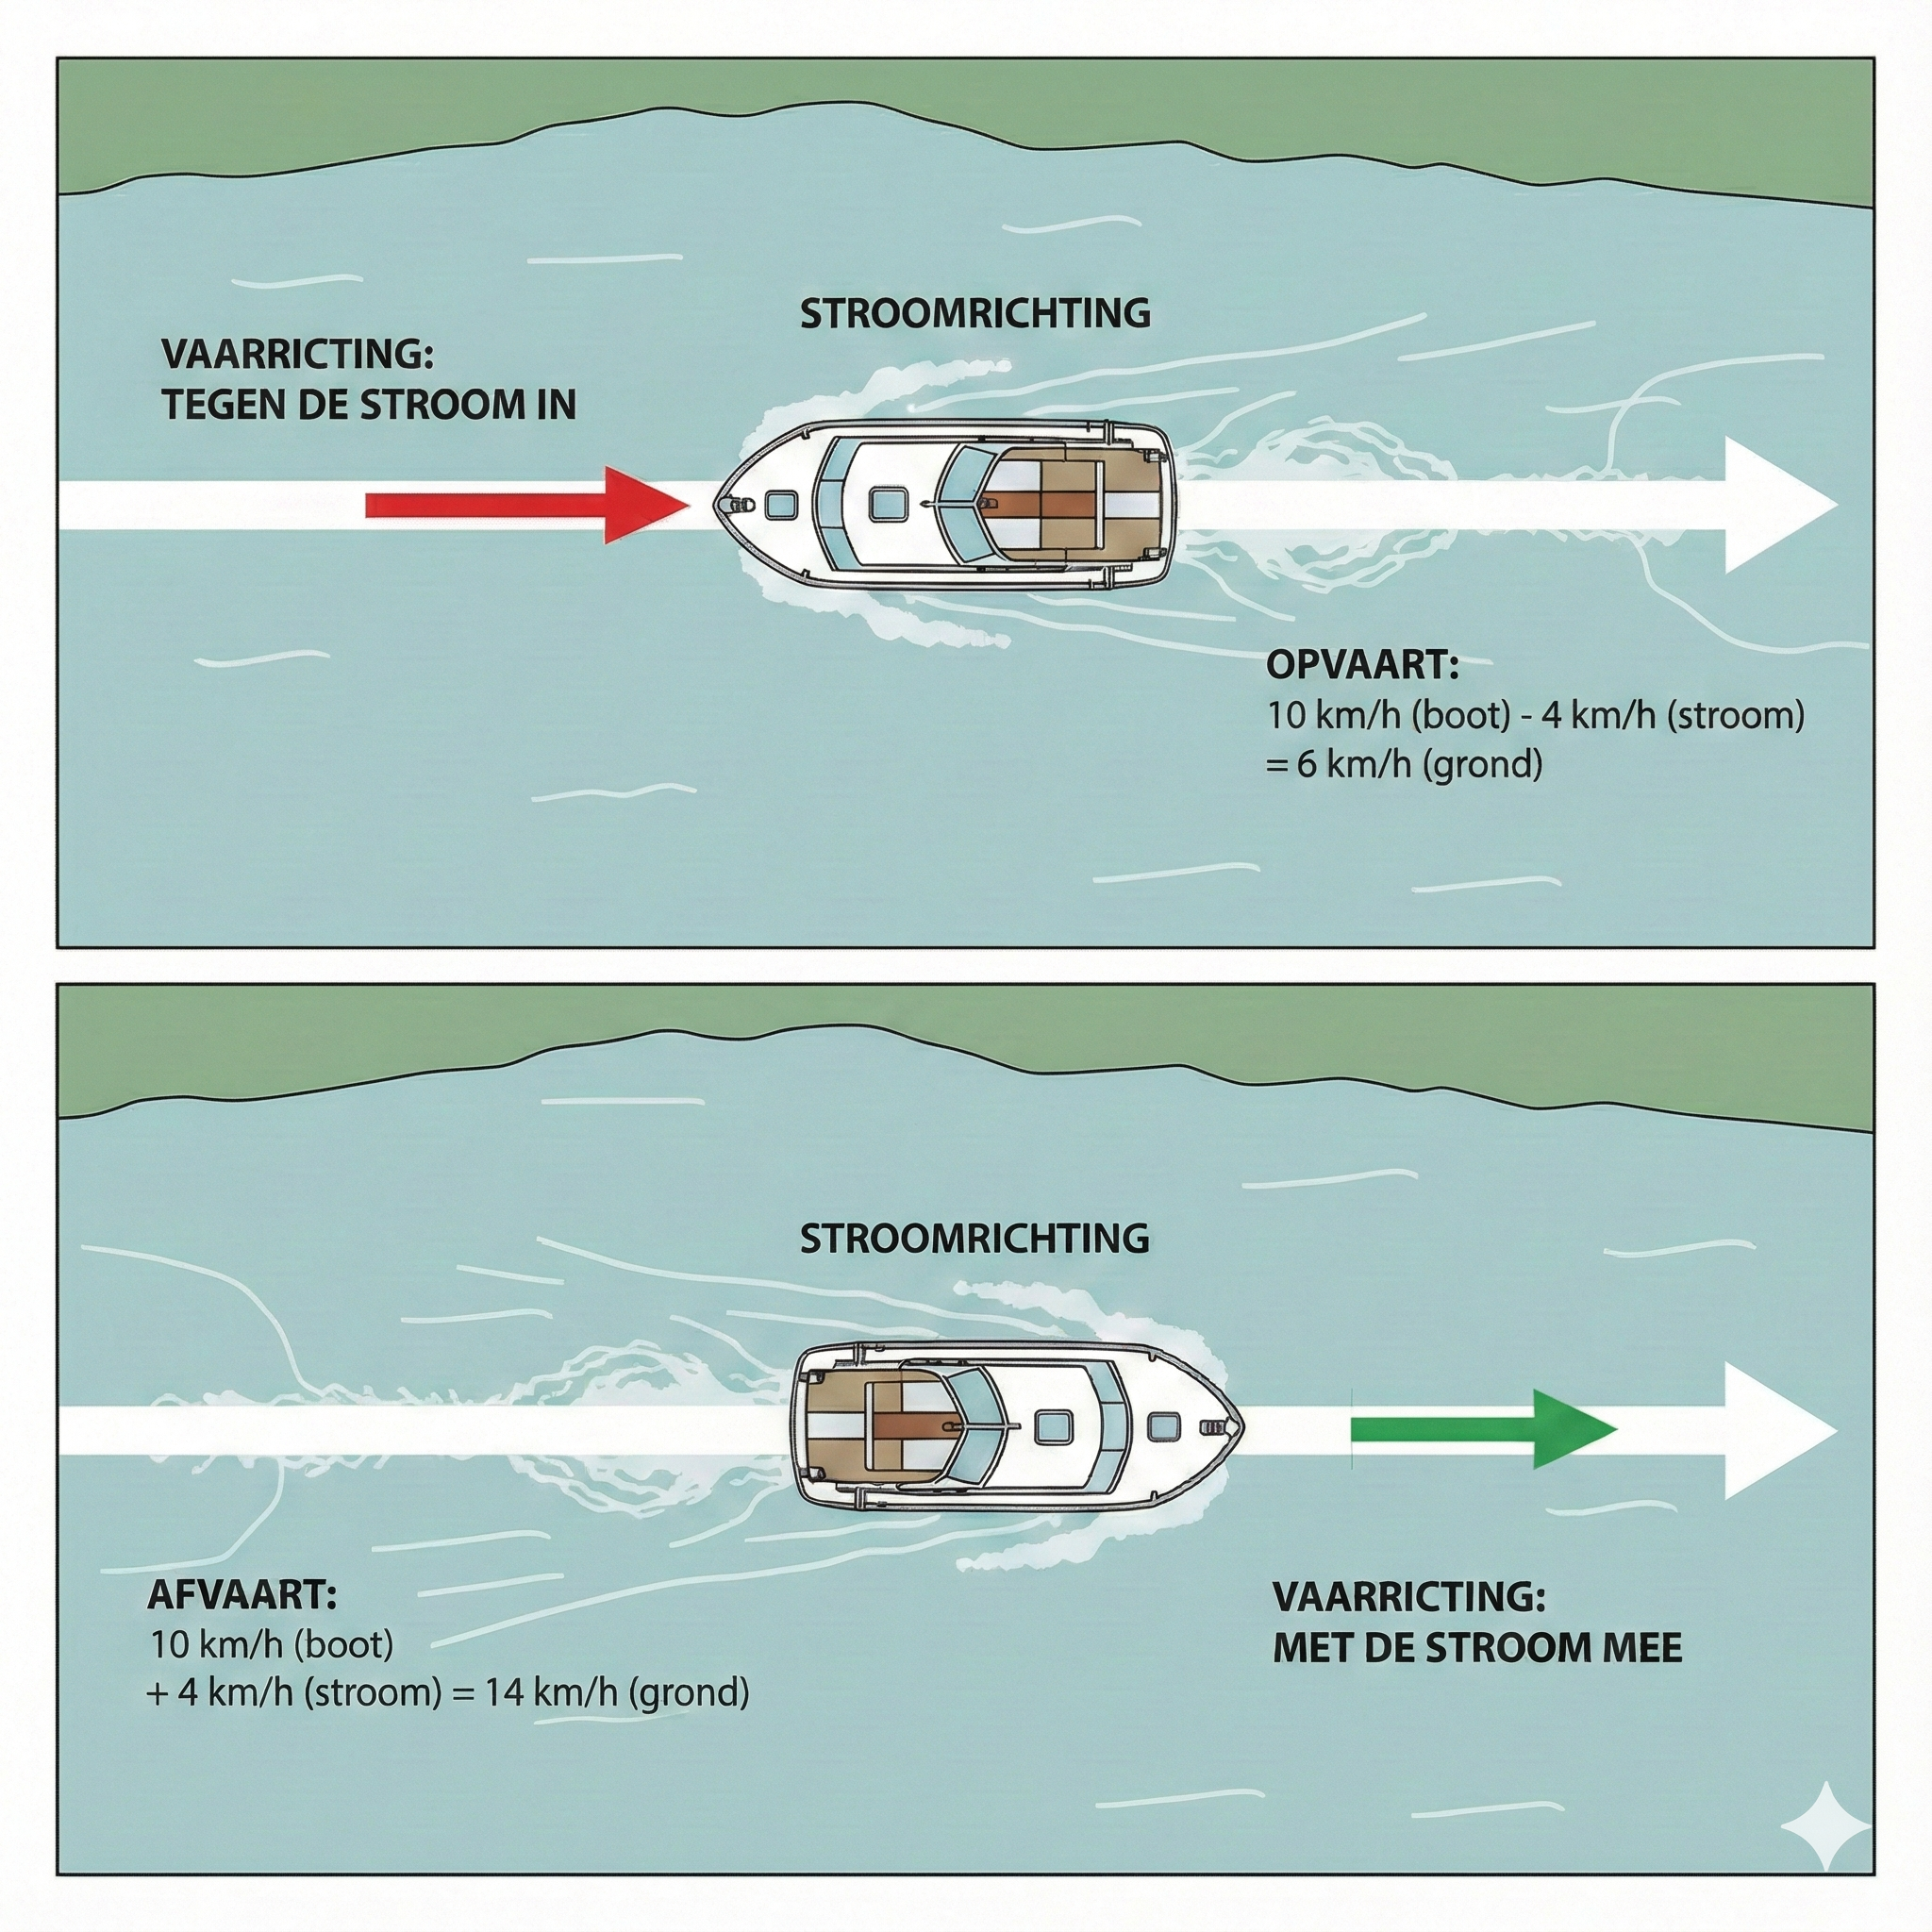
On this site, you've seen already a couple of times "Opvaart" or "Afvaart".
That are the dutch "slang words" for going Upstream or Downstream. As you can imagine,
going upstream, is way less fuel efficient than going downstream. For example the river
IJssel, that is fast-flowing, going Upstream, will take serious time and therefore also
serious amounts of fuel. Therefore, going in the "Afvaart" is economically way better.
The image here, will clarify what Opvaart and Afvaart mean and look like. In the image
the river flows from left to right. So, going from Right to Left, you are going against the
current. And going from Left to right, you are going with the current.
Here some of the definitions that must be clarified which are in place here:
Speed over Ground.
The real speed you will see on your GPS.
River Current
How fast the water flows trough the river.
Going with the flow: Add it to your STW (+)
Going against the flow: Substract it from your STW (-)
Why prefer downstream (Afvaart)?
Afvaart
10 km/h speed trough water + 4 km speed of the current = 14
km/h speed over ground.
Opvaart
10 km/h speed trough water - 4 km speed of the current = 6 km/h
speed over ground.
Note
Actually that is pretty simple to answer: Fighting yourself against
the current gives you a nice speed trought the water (STW), but a slow
speed over ground (SOG). When you are going downstream, you go with
the flow, and your speed trought the water will remain the same,
but the speed over ground will be:
(speed trough the water + water flow speed) = Faster Speed
over ground. (speed trough the water - water flow speed) = Slower Speed
over ground.
These are the 5 (five) countries we are going to visit. Please use the links
to get to the specific chapters (or routes, or legs) of each country.
We added, for good measurement, the ISO Country and the International country-code
for calling. There are objects (locks, bridges, etc) that you have to call and do not
have any VHF radio. (Or we could not find the VHF information.)
NL - +31 Many canals & rivers (Depending on the chosen route).
Of all five countries, we'll only be in Luxembourg for a short
stretch: just the section of the Moselle that lies wedged between
France, Germany, and Luxembourg. It starts at Écluse
d'Apach (FR) and ends at Wasserbillig (LUX),
where the Sauer River flows into the Moselle. On this approximately 36 km
long stretch, we'll be boating right along the border between Luxembourg
and Germany. More about this will follow in the section covering this
part of the route.
We try to update this website as often as possible!
The upgrade plans
24 Januari 2026
Our upgrade plans.
Support the KNRM!
Help them to help others!
KNRM
I would like to ask you to become a donor for the KNRM.
The KNRM is a fully private organisation, completely run by volunteers, financed by contributions and donations.
You will find all information about them on the website.
You can choose from a single one time payment or a monthly or yearly donation. Please Support them.
Our personal opinion is that every person out on the water should, by law be told to make a donation of €25,- per year.
But that is just our opinion.
Copyright, Disclaimer & Attribution
The legal stuff needed because of stupid....
The content on this website may include materials such as text, images, videos, and other media that are the property of their respective owners. All trademarks, logos, and copyrighted works remain the intellectual property of their original creators.
We strive to properly attribute and acknowledge all sources. If you are the copyright owner of any material featured on this site and believe it has been used without appropriate credit or permission, please contact us at [your contact email] so we can promptly address the issue.
Where applicable, the use of third-party content falls under fair use, creative commons licenses, or other applicable legal provisions. If specific attribution is required, it is provided directly alongside the respective material.
The images and data on this site are NOT intended for navigation or critical decision-making.
Any reliance on this information is strictly at your own risk. The information on this site is for PERSONAL USE ONLY.
You may print or copy parts of it for your own private use. Commercial use is strictly FORBIDDEN.
Do not sell, rent, or use this data for profit. Unauthorized commercial exploitation will be met with rigorous legal action to the fullest extent of the law
Furthermore, automated data scraping, harvesting, or feeding this content into large language models or AI systems is strictly PROHIBITED.
If automated tools crawl this site without express written permission, access will be blocked, and those responsible will be held liable for
unauthorized bandwidth usage and intellectual property infringement.